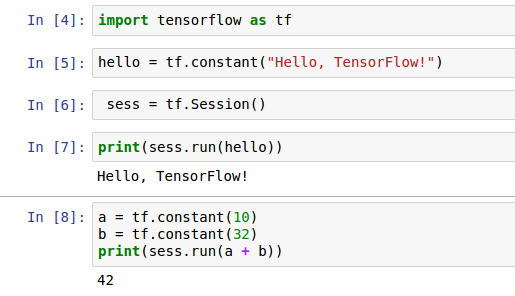
MNIST
All TensorFlow packages, including the demo models, are installed in the Python library. The exact location of the Python library depends on your system, but is usually one of:
/usr/local/lib/python2.7/dist-packages/tensorflow
/usr/local/lib/python2.7/site-packages/tensorflow
You can find out the directory with the following command (make sure to use the Python you installed TensorFlow to, for example, use python3 instead of python if you installed for Python 3):
$ python -c 'import os; import inspect; import tensorflow; print(os.path.dirname(inspect.getfile(tensorflow)))'
The simple demo model for classifying handwritten digits from the MNIST dataset is in the sub-directory models/image/mnist/convolutional.py. You can run it from the command line as follows (make sure to use the Python you installed TensorFlow with):
# Using 'python -m' to find the program in the python search path:
$ python -m tensorflow.models.image.mnist.convolutional
I tensorflow/stream_executor/dso_loader.cc:128] successfully opened CUDA library libcublas.so locally
I tensorflow/stream_executor/dso_loader.cc:128] successfully opened CUDA library libcudnn.so locally
I tensorflow/stream_executor/dso_loader.cc:128] successfully opened CUDA library libcufft.so locally
I tensorflow/stream_executor/dso_loader.cc:128] successfully opened CUDA library libcuda.so.1 locally
I tensorflow/stream_executor/dso_loader.cc:128] successfully opened CUDA library libcurand.so locally
Successfully downloaded train-images-idx3-ubyte.gz 9912422 bytes.
Successfully downloaded train-labels-idx1-ubyte.gz 28881 bytes.
Successfully downloaded t10k-images-idx3-ubyte.gz 1648877 bytes.
Successfully downloaded t10k-labels-idx1-ubyte.gz 4542 bytes.
Extracting data/train-images-idx3-ubyte.gz
Extracting data/train-labels-idx1-ubyte.gz
Extracting data/t10k-images-idx3-ubyte.gz
Extracting data/t10k-labels-idx1-ubyte.gz
I tensorflow/stream_executor/cuda/cuda_gpu_executor.cc:936] successful NUMA node read from SysFS had negative value (-1), but there must be at least one NUMA node, so returning NUMA node zero
I tensorflow/core/common_runtime/gpu/gpu_device.cc:885] Found device 0 with properties:
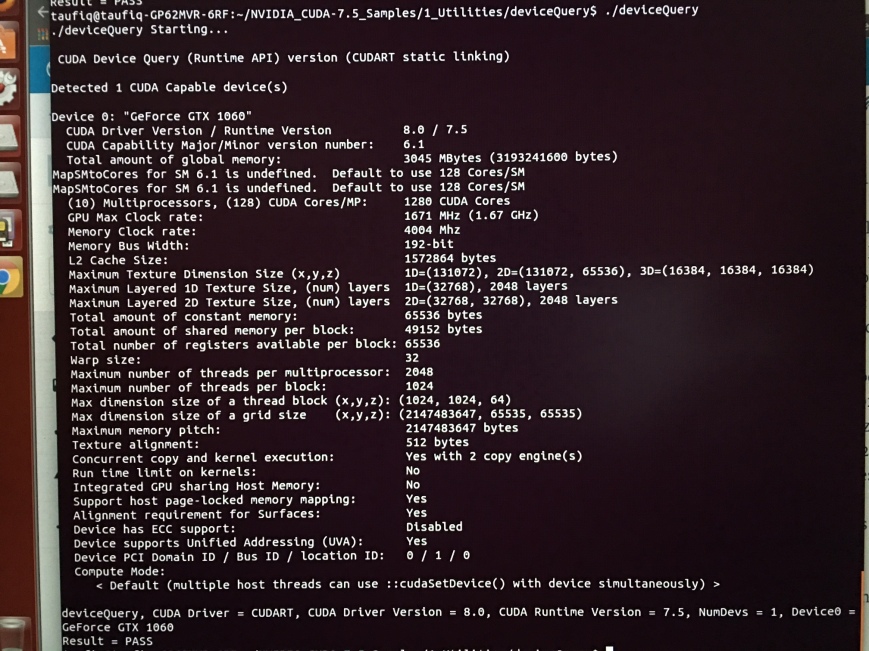
name: GeForce GTX 1060
major: 6 minor: 1 memoryClockRate (GHz) 1.6705
pciBusID 0000:01:00.0
Total memory: 2.94GiB
Free memory: 2.88GiB
I tensorflow/core/common_runtime/gpu/gpu_device.cc:906] DMA: 0
I tensorflow/core/common_runtime/gpu/gpu_device.cc:916] 0: Y
I tensorflow/core/common_runtime/gpu/gpu_device.cc:975] Creating TensorFlow device (/gpu:0) -> (device: 0, name: GeForce GTX 1060, pci bus id: 0000:01:00.0)
Initialized!
And I got this error! due to cuDNN incorrect installation
E tensorflow/stream_executor/cuda/cuda_dnn.cc:378] Loaded runtime CuDNN library: 5005 (compatibility version 5000) but source was compiled with 5105 (compatibility version 5100). If using a binary install, upgrade your CuDNN library to match. If building from sources, make sure the library loaded at runtime matches a compatible version specified during compile configuration.
F tensorflow/core/kernels/conv_ops.cc:532] Check failed: stream->parent()->GetConvolveAlgorithms(&algorithms)
Aborted (core dumped)
Then I started a new terminal window, activated the virtualenv and ran it again, and it works !
Took under 1 min, 8500 steps 0.8% validation and test error
LTSM
$ wget http://www.fit.vutbr.cz/~imikolov/rnnlm/simple-examples.tgz
$ tar -xvf simple-examples.tgz
$ python tensorflow/tensorflow/models/rnn/ptb/ptb_word_lm.py –data=./simple-examples/data –model=small – See more at: http://www.nvidia.com/object/gpu-accelerated-applications-tensorflow-running-jobs.html#sthash.err4u2QJ.dpuf
This one gave an error – apparently incompatibility with latest version of TF
AttributeError: ‘module’ object has no attribute ‘deprecated’
INCEPTION V3
Google’s Inception v3 network is a cutting-edge convolutional network designed for image classification. Training this model from scratch is very intensive and can take from several days up to weeks of training time. An alternative approach is to download the model pre-trained, and then re-train it on another dataset.
First, download the pre-trained Inception v3 model, which includes the checkpoint file model.ckpt-157585:
$ mkdir /home/taufiq/data
Next, clone the TensorFlow models repository:
A dataset containing labeled images of flowers will be used to re-train the network. Follow these steps to download and preprocess the 218 MB flowers dataset:
$ export FLOWERS_DIR=/home/taufiq/data/flowers
$ mkdir -p $FLOWERS_DIR/data
$ bazel build inception/download_and_preprocess_flowers
$ bazel-bin/inception/download_and_preprocess_flowers $FLOWERS_DIR/data
# Ignore error “…/build_image_data: No such file or directory”
$ python inception/data/build_image_data.py –train_directory=$FLOWERS_DIR/data/raw-data/train/ –validation_directory=$FLOWERS_DIR/data/raw-data/validation/ –output_directory=$FLOWERS_DIR/data –labels_file=$FLOWERS_DIR/data/raw-data/labels.txt
…
Finished writing all 500 images in data set.
…
Finished writing all 3170 images in data set.
$ cd –
This will download the 218 MB flowers image dataset and then preprocess it into training and validation sets. The re-training procedure can then be executed using these steps (note that the additional commands are to avoid a dependency on the Bazel build system):
$ mkdir -p $FLOWERS_DIR/train
$ bazel build inception/flowers_train
$ cd ~/data/tensorflow-models/inception/inception/slim
$ edit ops.py
      gamma = variables.variable('gamma',
                                 params_shape,
-                                 initializer=tf.ones_initializer,
+                                 initializer=tf.ones_initializer(),
                                 trainable=trainable,
                                 restore=restore)
$ export FLOWERS_DIR=/home/taufiq/data/flowers
$ export INCEPTION_DIR=/home/taufiq/data/
$ cd ~/data/tensorflow-models/inception
$ bazel-bin/inception/flowers_train –train_dir=$FLOWERS_DIR/train –data_dir=$FLOWERS_DIR/data –pretrained_model_checkpoint_path=$INCEPTION_DIR/inception-v3/model.ckpt-157585 –fine_tune=True –initial_learning_rate=0.001 -input_queue_memory_factor=1 –max_steps=500 –num_gpus 1 –batch_size=64
And I got this error
File “/home/taufiq/tensorflow/local/lib/python2.7/site-packages/tensorflow/python/ops/variable_scope.py”, line 665, in <lambda>
shape.as_list(), dtype=dtype, partition_info=partition_info)
TypeError: ones_initializer() got multiple values for keyword argument ‘dtype’
…
step 450, loss = 1.21 (21.7 examples/sec; 2.951 sec/batch)
step 460, loss = 1.19 (21.6 examples/sec; 2.964 sec/batch)
step 470, loss = 1.07 (21.8 examples/sec; 2.931 sec/batch)
step 480, loss = 1.11 (21.7 examples/sec; 2.950 sec/batch)
step 490, loss = 1.24 (21.7 examples/sec; 2.956 sec/batch)
(Training can also be run on multiple GPUs by adding the –num_gpus=N option). The re-trained model can now be evaluated on the validation dataset:
$ mkdir -p $FLOWERS_DIR/eval
$ bazel build inception/flowers_eval
$ bazel-bin/inception/flowers_eval –eval_dir=$FLOWERS_DIR/eval –data_dir=$FLOWERS_DIR/data –subset=validation –num_examples=500 –checkpoint_dir=$FLOWERS_DIR/train –input_queue_memory_factor=1 –run_once
Successfully loaded model from /data/flowers/train/model.ckpt-499 at step=499.
starting evaluation on (validation).
precision @ 1 = 0.8574 recall @ 5 = 0.9980 [512 examples]
Here the top-1 (i.e., single guess) classification accuracy is 85% after retraining the model for 500 steps. The accuracy can be improved further by training for more steps. For more details on using the Inception v3 model, see the README document.
– See more at: http://www.nvidia.com/object/gpu-accelerated-applications-tensorflow-running-jobs.html#sthash.err4u2QJ.dpuf